If you've already created a project using another module (Album Builder or Image Brander), you can create a sub-project (Blog Collage) to use the images you've previously imported for your other project.
*Please note that more than 20 collages within a sub-project can cause the software to crash on export due to memory limitations.
Access Blog Collage
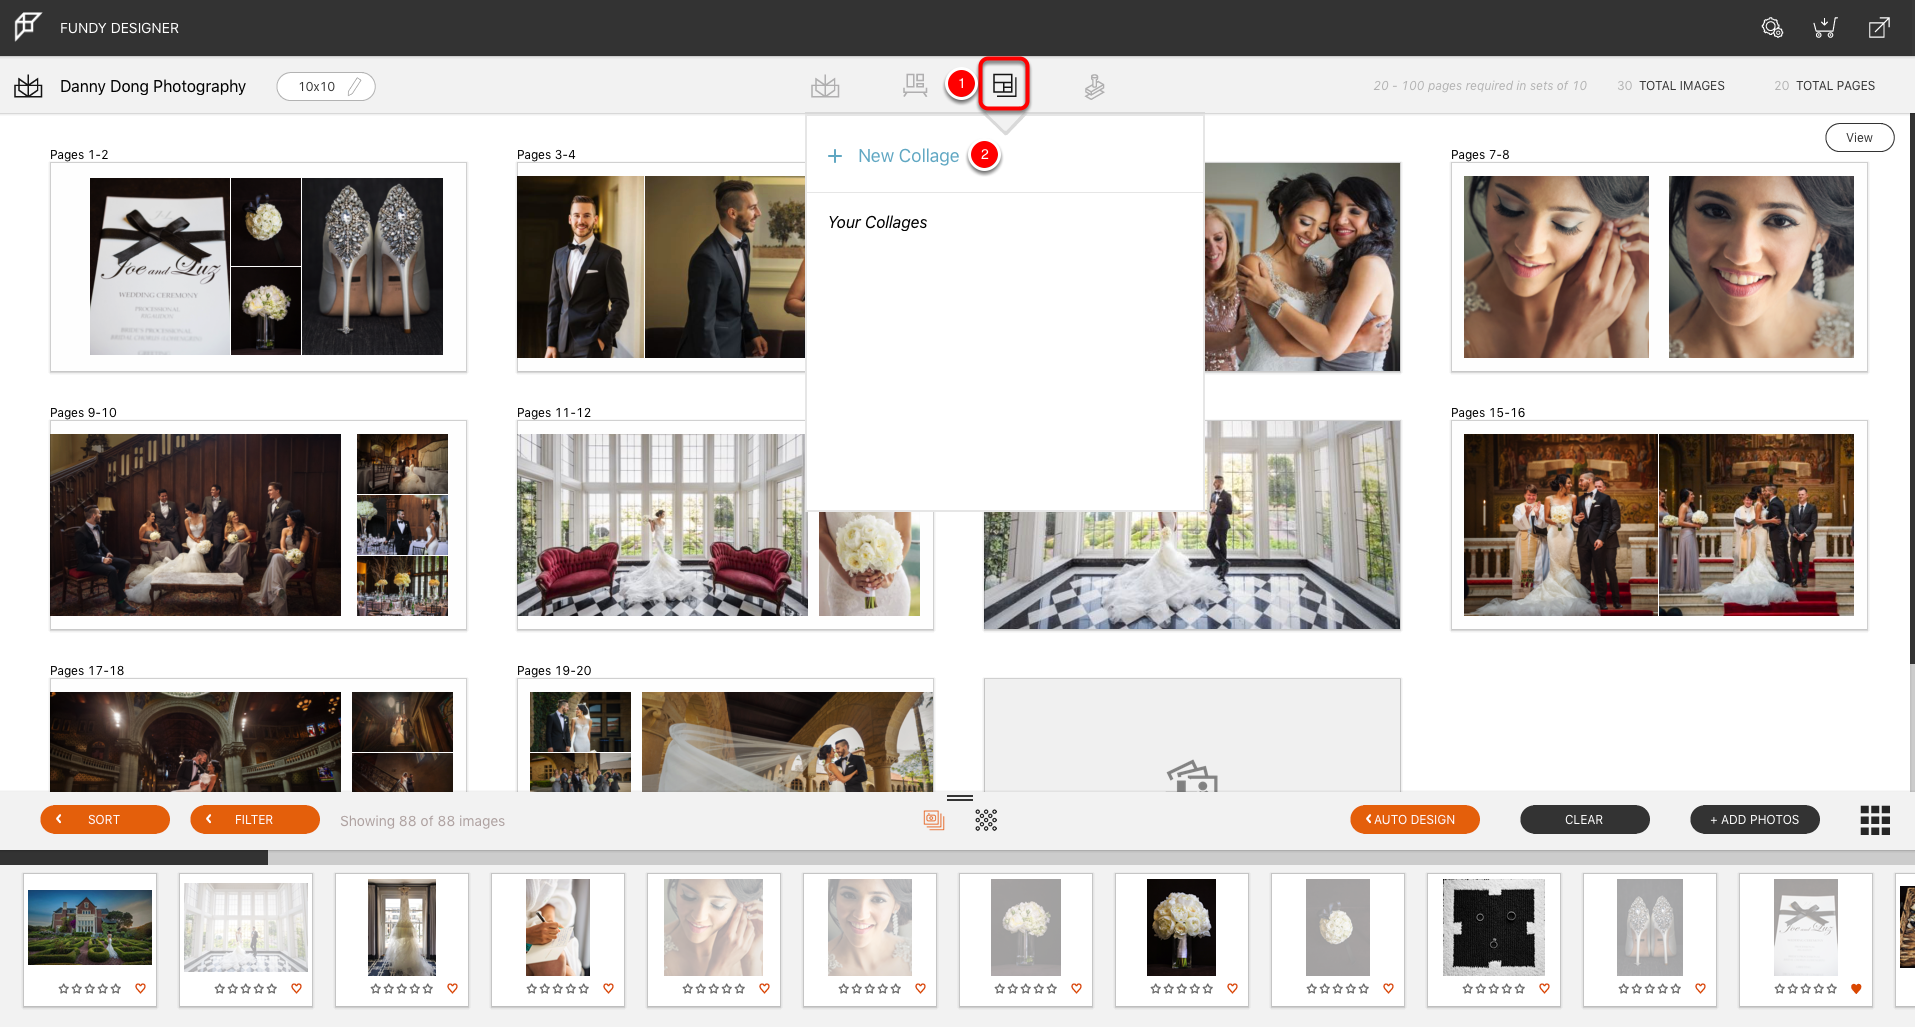
From the project you are currently working on, select the Blog Collage icon. Then select "New Collage".
Name Your Collage
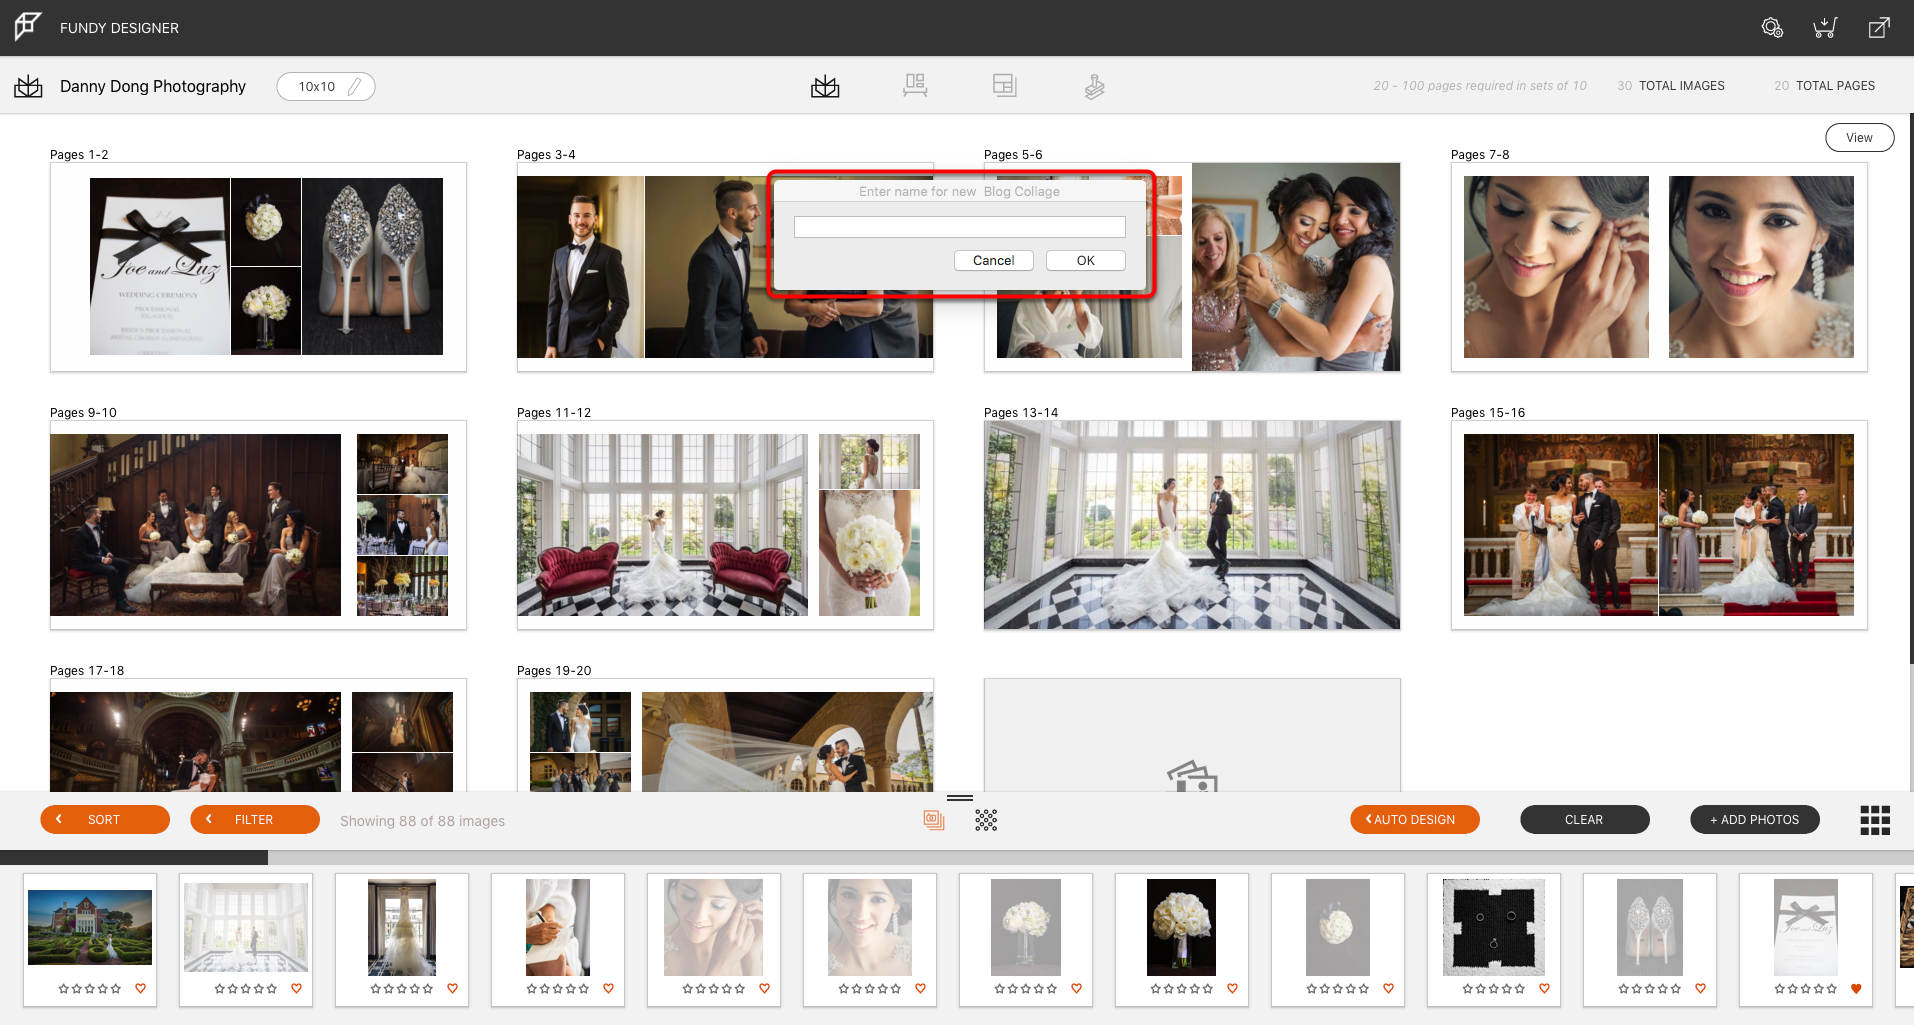
Once you select the Blog Collage module, you will be prompted to enter the name of your Blog Collage sub-project.
Begin Designing

Now that you have created your subproject, you can begin designing!
Like Album Builder, Blog Collage uses our patented Drop Zone 2.0 technology to create designs with your images. You can choose from a seemingly endless variety of auto generated Drop Zone layouts for your Collage. The layouts change and update depending on the number of images in a Drop Zone and image aspect ratios.
Drag and Drop Images to Create a Collage
Select the desired group of images with your mouse. Hold down the Shift key for multiple images or the Command/Control key to select individual images. Once selected, drag all the images from the image well onto the design space.
All of the selected images will be used in the creation of an auto design. Of course, you have total control over the design.
Adding Images
Once you've placed images on a Collage, you can add more images by selecting them from the Thumbnail Window and dragging them onto the Collage. With Drop Zones 2.0, as you hover with your image, you'll see a yellow highlight box appear indicating where the image will be placed.
If a yellow square appears over an image, it will swap with the photo you are dragging when you release the image. If a yellow highlight box appears to the top/bottom/left/right of the images in your collage, that is where the image will be placed.
The new image(s) will be added to the collage.
Deleting Images
To delete an image from a collage, select the image and click the Delete key on your keyboard. Additionally, you can right-click the image and a contextual menu will appear. Select "Remove Image" to delete that image from the collage.
Swapping Images
You can move and swap images in the collage by selecting an image, then dragging and dropping it into its new spot. The image you're swapping it with will display a yellow highlight box. Keep in mind you can see additional options for auto generated designs by clicking the Layouts icon.
Undo
Keep in mind you can undo changes made in this view by clicking Edit > Undo, or using Command (or Control) + Z.
Note: Redo = Command (or Control) + Y
Design tools give you the ability to make adjustments to all the images in your collage or individually. This is also how you can change your background color, add strokes and drop shadows. You can also open any of your images directly into your image editing program.
Design Tools are located to the right of the collage. These tools affect all the images in your collage.
1) RATIO: This provides the ability to change the ratio of your images within the collage.
2) EXTERNAL EDITOR: Clicking this will open the images in an external image editor (Photoshop, Photoshop Elements, etc.) for editing. Once you save your images with changes, it will dynamically update them in Blog Collage.
3) SHUFFLE: This will shuffle the placement of the images in your collage.
4) BACKGROUND Options: This will allow you to add a background color to your collage, a border, a square canvas for Instagram and an extension to the top/bottom/left/right.
5) BLACK & WHITE/SEPIA: This will allow you to apply one of 3 Black & White or Sepia filters to all the images in your collage. Additionally, once you choose a filter, a contrast slider will appear giving you more control over the look of the filter.
6) EDIT: Provides you even further control over your design with options for image spacing, stroke width and color and drop shadow options.
Image Ratio

Drop Zone ratio options:
3:2 will keep your images in a 3:2 ratio regardless of whether they are horizontal or vertical.
1:1 will change all of your images to a square ratio.
Original will keep the original ratio of the images as they were imported.
Horizontal will make all of your images horizontal regardless of the original ratio.
Vertical will make all of your images vertical regardless of the original ratio.
External Editor
You should first choose your default External Editor from the Edit menu. Clicking the External Editor icon will open the images in your default External Editor. Once you save the changes to the images, your collage will dynamically update to reflect the changes.
Shuffle Auto Designs
Clicking the shuffle designs icon will shuffle your images through different auto design options based on the images used in your collage.
Background Options
Clicking this icon will open the Background Options for your collage.
1. Background has an option for choosing the color and size of your background border. Clicking the color box will open up your system color picker.
2. Square Canvas will quickly extend your collage background to a square for posting on Instagram.
3. Extension will add a background extension to the top/bottom/left/right with a slider for changing the extension size.
Black & White/Sepia

The BW icon will allow you to apply one of 3 Black and White and Sepia filters to all the images in your collage Drop Zone. Additionally, when you select a filter, a Contrast slider will appear giving you more refinement over the BW and Sepia filters.

Edit

The Edit icon allows you to adjust the image Spacing, Stroke (color and size) and Drop Shadow (color, direction, opacity, distance, and blur).
Multiple Blog Collages
Adding more collages is as simple as clicking the "Add Collage" button. With more collages, you can navigate through them just as you would album pages. As you add collages, it will automatically sequentially number them so you know how many collages you have in any Blog Collage sub-project. When you are ready for export, Fundy Designer will export the collages with the Blog Collage name and add a number after them, e.g., Wedding Collage-1, Wedding Collage-2. As you create new collages, the used images will be greyed out in your image well, similar to Album Builder.
Individual Image Controls

Image specific tools are located at the bottom of any select image. These tools affect a single image in your collage.
1) RATIO: This provides the ability to change the ratio of your images within the collage. (3:2/1:1/Original/Horizontal/Vertical)
2) EXTERNAL EDITOR: Clicking this will open the image in an external image editor (Photoshop, Photoshop Elements, etc.) for editing. Once you save your image with changes, it will dynamically update in Blog Collage.
3) BLACK & WHITE/SEPIA: This will allow you to apply one of 3 Black & White or Sepia filters to your image. Additionally, once you choose a filter, a contrast slider will appear giving you more control over the look of the filter.
4) FLIP IMAGE HORIZONTALLY: This will flip your image horizontally within the Drop Zone.
5) EDIT: Provides you even further control over your design with options for image opacity, zoom and image rotation.
You can add and save personalized branding styles to apply to your collages. This can include a logo, or design elements.
Default and Personal Styles

When you click the Styles icon from the left toolbar, you'll be able to view and select the pre-populated Default Styles. If you have existing styles you've created and saved in the past, those will be shown under the Pinned Styles tab. Any of the default styles can be customized with your logo and text. They are designed to get you as close as possible to a finished style without having to start from the beginning.
Custom Styles

Style Tools are available to the right of your Collage in Collage View and allow you to customize the look of your Collage.
1) HORIZONTAL COLOR BAR: This allows you to toggle a color bar in the style. See the Horizontal Color Bar section of this page for more information.
2) CUSTOM TEXT: This tab allows you to add Custom Text to the Collage. See the Custom Text section of this page for more information.
3) PERSONAL LOGO: This tab will allow you to import your logo(s). See the Personal Logo section of this page for more information.
4) PIN STYLE: This tab allows you to save the Style on the current Collage for use on future Collages. Once Pinned, the Style will appear in your Pinned Styles. See the Pinned Styles section of this page for more information.
5) LAYOUTS: This icon will take you to the Quick Design Picker, where you can look through dozens of design options for your collage.
Pinned Styles

Once you've designed a Style you like, clicking the Pin Style icon adds the style you created to your Personal Styles tab. To use a pinned style, click the style you want to use and it's immediately used on your collage. Any pinned styles in your personal styles will be saved with a pin icon inside the circle in the upper right. Your history will also show in this view. Anything without a pin is a history state. To delete a personal style, right-click and choose Delete.
Adding Your Logo

Click the Personal Logo tab to add a logo file to use in creating your personal style. Once you click the icon, you'll be taken to the Logo Import screen. Click the add image icon and navigate to your logo file. Please keep in mind that it must be a JPEG or PNG with transparency. Try to keep your logo file under 2,000 pixels. Once you have your logo imported, click the logo and it will be applied to your collage.

Once you click the icon, you'll be taken to the Logo Import screen. Click the add image icon and navigate to your logo file. Please keep in mind that it must be a JPEG or PNG with transparency. Try to keep your logo file under 2,000 pixels. Once you have your logo imported, click the logo and it will be applied to your collage.

Selecting the logo will display the Drop Zone and toolbar where you can:
1) Resize or move the Drop Zone using the blue border, just you would with a Drop Zone in Album Builder.
2) Change the opacity of your logo.
3) Rotate the logo 90 degrees.
4) Delete the Drop Zone containing the logo.
Custom Text

Selecting the Custom Text icon will place a Text Drop Zone on the image. The toolbar for the text Drop Zone features the following:
1) Resize or move the Drop Zone using the blue border as you would with a Drop Zone in Album Builder.
2) Change the font to anything you have loaded on your system.
3) Rotate the text 90 degrees.
4) Bold text.
5) Italicize text.
6) Change text color
7) A slider to change the text opacity.
8) Edit the text. A dialogue box will appear where you can enter your text. Hitting the Return/Enter key will apply the text changes.
9) Delete the Drop Zone containing the text.
Horizontal Color Bar

You can click the Color Bar icon to toggle a color bar on/off. If you chose a default style that already has a color bar, it will already be displayed. Click the color bar icon to turn it off.
Selecting the Color Bar will display the Drop Zone and toolbar for that Drop Zone where you can:
1) Resize or move the Drop Zone using the blue border as you would with a Drop Zone in Album Builder.
2) Change the color of the bar.
3) Color Bar Opacity, where you can lower the opacity of the color bar.
4) Delete the Color Bar.
You can add and save personalized branding styles to apply to your collages. This can include a logo, or design elements.
Default and Personal Styles
When you click the Styles icon from the left toolbar, you'll be able to view and select the pre-populated Default Styles. If you have existing styles you've created and saved in the past, those will be shown under the Pinned Styles tab. Any of the default styles can be customized with your logo and text. They are designed to get you as close as possible to a finished style without having to start from the beginning.
Custom Styles
Style Tools are available to the right of your Collage in Collage View and allow you to customize the look of your Collage.
1) HORIZONTAL COLOR BAR: This allows you to toggle a color bar in the style. See the Horizontal Color Bar section of this page for more information.
2) CUSTOM TEXT: This tab allows you to add Custom Text to the Collage. See the Custom Text section of this page for more information.
3) PERSONAL LOGO: This tab will allow you to import your logo(s). See the Personal Logo section of this page for more information.
4) PIN STYLE: This tab allows you to save the Style on the current Collage for use on future Collages. Once Pinned, the Style will appear in your Pinned Styles. See the Pinned Styles section of this page for more information.
5) LAYOUTS: This icon will take you to the Quick Design Picker, where you can look through dozens of design options for your collage.
Pinned Styles
Once you've designed a Style you like, clicking the Pin Style icon adds the style you created to your Personal Styles tab. To use a pinned style, click the style you want to use and it's immediately used on your collage. Any pinned styles in your personal styles will be saved with a pin icon inside the circle in the upper right. Your history will also show in this view. Anything without a pin is a history state. To delete a personal style, right-click and choose Delete.
Adding Your Logo
Click the Personal Logo tab to add a logo file to use in creating your personal style. Once you click the icon, you'll be taken to the Logo Import screen. Click the add image icon and navigate to your logo file. Please keep in mind that it must be a JPEG or PNG with transparency. Try to keep your logo file under 2,000 pixels. Once you have your logo imported, click the logo and it will be applied to your collage.
Once you click the icon, you'll be taken to the Logo Import screen. Click the add image icon and navigate to your logo file. Please keep in mind that it must be a JPEG or PNG with transparency. Try to keep your logo file under 2,000 pixels. Once you have your logo imported, click the logo and it will be applied to your collage.
Selecting the logo will display the Drop Zone and toolbar where you can:
1) Resize or move the Drop Zone using the blue border, just you would with a Drop Zone in Album Builder.
2) Change the opacity of your logo.
3) Rotate the logo 90 degrees.
4) Delete the Drop Zone containing the logo.
Custom Text
Selecting the Custom Text icon will place a Text Drop Zone on the image. The toolbar for the text Drop Zone features the following:
1) Resize or move the Drop Zone using the blue border as you would with a Drop Zone in Album Builder.
2) Change the font to anything you have loaded on your system.
3) Rotate the text 90 degrees.
4) Bold text.
5) Italicize text.
6) Change text color
7) A slider to change the text opacity.
8) Edit the text. A dialogue box will appear where you can enter your text. Hitting the Return/Enter key will apply the text changes.
9) Delete the Drop Zone containing the text.
Horizontal Color Bar
You can click the Color Bar icon to toggle a color bar on/off. If you chose a default style that already has a color bar, it will already be displayed. Click the color bar icon to turn it off.
Selecting the Color Bar will display the Drop Zone and toolbar for that Drop Zone where you can:
1) Resize or move the Drop Zone using the blue border as you would with a Drop Zone in Album Builder.
2) Change the color of the bar.
3) Color Bar Opacity, where you can lower the opacity of the color bar.
4) Delete the Color Bar.
Exporting Your Blog Collage

To export your Collage, click Export icon in the upper right corner. The Export panel will be displayed.
Enter the maximum width of the exported collage (since web images scroll, you don't need the height) and the quality setting you prefer in the available fields and click Export. If you've previously exported a collage, your recent sizes will be displayed in the "Recent Export Sizes" box. You can select an export setting directly from this box.
When you are ready to export, click the Export button. You'll be prompted for a save location on your computer.
If you have multiple collages in this project, all of them will be exported at once. Each collage will be sequentially numbered with your collage name. When the export is finished, you'll receive a notification that it's finished.